Archiv des Autors: Joerg

Blender 2.6: „remove doubles“ für alle Objekte

Mal wieder eines dieser „Google-Löcher“: man findet nix zu einem Suchbegriff. Stopfen wir dieses Loch (und für mich ist es eine Art Zwischenablage, wenn ich das mal wieder brauchen sollte).

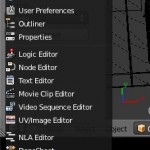
Problemstellung: man hat eine 3D-Szene beispielsweise aus einem anderen Programm in Blender importiert, und würde gerne damit weiterarbeiten. Stellt nun aber fest, dass praktisch alle Dreiecke im Modell doppelt sind – anwählen, Editmode, „Remove doubles“, „recalculate normals“ Editmode verlassen geht ja noch für 10 Objekte. Was aber, wenn das über 100 sind? Richtig, Blender hat ja zum Glück einen eingebauten Python-Interpreter. Also ein beliebiges Blender-Fenster schnappen, die Python-Konsole aufmachen über den kleinen Button unten links:

…und dann das hier einfach reinkopieren, ggf. noch einmal Return drücken. Vorher müssen die Objekte selektiert werden, die der Prozedur unterworfen werden sollen (ggf. mal mit ein paar anfangen, weil das Skript eine Weile braucht, wenn komplexe Geometrien dabei sind):

import bpy
if bpy.context.selected_objects != []:
	for ob in bpy.context.selected_objects:
		if ob.type == 'MESH':
			bpy.context.scene.objects.active = ob 
			bpy.ops.object.mode_set(mode='EDIT') 
			bpy.ops.mesh.select_all() 
			# remove doubles:
			bpy.ops.mesh.remove_doubles() 
			# recalculate outside normals:
			bpy.ops.mesh.normals_make_consistent(inside=False)
			bpy.ops.object.mode_set(mode='OBJECT')


Debian Update: Grub-Probleme

So, da war es mal wieder: das Update des Grauens, das man „mal schnell“ anstoßen wollte und das einem dann den Sonntagnachmittag versaut. Bei mir war’s das Update auf Lenny 6.0.3. Als mich apt-get nach den Platten gefragt hat, auf denen ich Grub installieren möchte, wurde ich schon stutzig. sda, sdb, md1 und md2 standen zur Auswahl – und es kam, wie es kommen musste: egal, welche ich ausgewählt habe, kam nur dieses Gemopper:

/usr/sbin/grub-setup: warn: This msdos-style partition label has no post-MBR gap; 
    embedding won't be possible!.
/usr/sbin/grub-setup: error: embedding is not possible, but this is required when 
    the root device is on a RAID array or LVM volume.

Na toll. Leider spuckt Tante Google hierzu nicht sonderlich viel zielführendes aus, also hier mein kleines How-To.

Warnhinweis: bitte nur nachmachen, wenn man weiß, was man tut. Alle Kommandos, die hier stehen, eignen sich prima zum kaputtkonfigurieren des GANZEN Systems.

Das Szenario, das ich hatte, war dies: RAID-1 für /boot und / (und für Swap. Ich weiß, das ist Kappes. Also ändern wir das gleich, während wir dran sind). Hier meine Konfig:

cat /proc/mdstat 
Personalities : [raid0] [raid1] [raid6] [raid5] [raid4] 
md2 : active raid1 sda3[0] sdb3[1]
      726266432 blocks [2/2] [UU]

md1 : active raid1 sda2[0] sdb2[1]
      2104448 blocks [2/2] [UU]

md0 : active raid1 sda1[0] sdb1[1]
      4200896 blocks [2/2] [UU]

Die Einzelplatten sind gleich konfiguriert, und zwar so:

I/O size (minimum/optimal): 512 bytes / 512 bytes
Disk identifier: 0x0004be32

   Device Boot      Start         End      Blocks   Id  System
/dev/sda1               1     8401994     4200997   fd  Linux raid autodetect
/dev/sda2         8401995    12611024     2104515   fd  Linux raid autodetect
/dev/sda3        12611025  1465144064   726266520   fd  Linux raid autodetect

…und die „1“ beim ersten Partitions-Start ist auch gleich das Problemkind. Allerdings hatte ich richtig Massel: die sda1 und sdb1 ergeben md0, und die ist bei mir als Swap eingetragen. Also müssen wir die umbauen und so einrichten, dass sie „höher“ als am Block 1 anfängt. Let’s go:

swapoff -a
mdadm --stop /dev/md0
fdisk /dev/sda

…und die Partition 1 umbasteln: löschen (d, 1), neu anlegen (n, p, 1, 63, [Maximalgröße hier eingeben]), Typ ändern (t, 1, fd), schreiben: w. Wer mag, tut das gleiche auf sdb (aus Gründen der Ästhetik, damit die Partitionen gleich groß sind zum Beispiel).  Dann bauen wir das RAID wieder zusammen, dieses Mal als Raid-0 für den Swap (warum auch nicht?):

mdadm --create /dev/md0 --level=0 --raid-devices=2 /dev/sda1 /dev/sdb1

Und: Energie, Scotty:

mkswap /dev/md0

nebst einem

swapon -a

So, dann bitte nicht vergessen, Grub wieder draufzubügeln – dieses Mal hoffentlich ohne Fehlermeldung. Sonst wird der nächste Reboot etwas hässlich… ;-)

Danke an die Jungs aus dem Hetzner-Forum – die hatten die Lösung (allerdings halt nicht zu Googeln…)

Samsung 2TB Ecogreen F4 HD204UI firmware-Upgrade

Wow, das hat Schweiß gekostet. Die 2TB Samsung-Platte ist an sich ein recht gutes Gerät für den Preis. Leider ist das Updaten der Firmware alles andere als ein Kinderspiel. Hier möchte ich meine Erfahrungen zusammenschreiben, die ich mir aus dem Web zusammenkratzen musste. Also der Reihe nach:

  1. Die Platte hat einen Firmwarefehler (Beschreibung auf sourceforge), der bewirkt, dass bei aktiviertem Cache Schreibvorgänge „vergessen“ werden, wenn währenddessen SMART-Kommandos an die Platte geschickt werden.
  2. Auf der Samsung-Seite gibt es ein Tool, mit dem man die Firmware auf den neusten Stand bringen kann. Klingt soweit recht einfach. Aber:
    1. Die neue und die alte Firmware unterscheiden sich in der Versionsnummer nicht.
    2. Lediglich bei Platten, die nach Dezember 2010 hergestellt wurden (Aufdruck auf dem Platten-Label), kann man sicher sein, dass alles ok ist.
    3. Eine FAQ: das Flashen der Firmware löscht keine Daten auf der Platte. Aber: Man kann durch den Bug sowieso nicht sicher sein, dass alles korrekt geschrieben wurde. Und: Ein Backup hat noch niemand geschadet. Kein Backup schon.
    4. Man kann die neue Firmware auch zweimal aufspielen. Schadet nicht, nutzt auch nix.
  3. Also, ein FreeDOS-Iso geladen (Update: Quadzilla hat einen Link gepostet, wo das Samsung-Tool bereits enthalten ist!). Mit isomaster (am besten unter Linux, da ist er kostenlos dabei) die F4EG.EXE in das Image packen. Einfach in das Hauptverzeichnis werfen – die Datei ist so groß, dass man sie nicht gut im Disketten-Image unterkriegt – weil ich mit den FreeDOS-CD-ROM-Treibern meine Not hatte. Bootet man die als Live-CD, erkennen die SATA-CD-ROM-Laufwerke nicht. Andere Laufwerke nur vielleicht. Bootet man FreeDOS aber in den richtigen Modus, ist der CD-Rom-Typ eigentlich wurst. Siehe unten!
  4. Einen PC suchen (mit dem Mac schaut man hier in die Röhre, auch SATA-USB-Adapter sind zum Flashen ungeeignet). Der PC sollte keine SATA-PATA Emulation fahren (wenn, dann sollte man sie im BIOS deaktivieren können, sonst ist es Essig mit dem Flashen – auch dann, wenn das BIOS ausschließlich die Emulation via IDE unterstützt – dann steigt F4EG mit der Fehlermeldung „internal Error“ aus und man hat keine neue Firmware!)
  5. Jetzt wird’s spannend:

Gaui 425 „Röntgenbild“

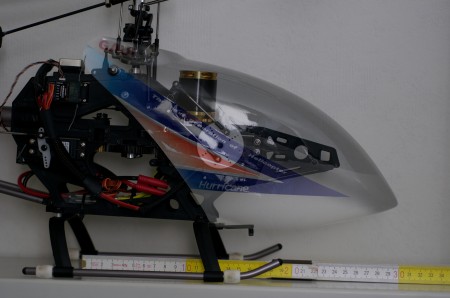
Hier ist ein Foto meines Gaui 425 – inklusive Maßstab, mit und ohne Haube [GFK-Version, nicht der Joghurtbecher] als „Röntgenbild“. Falls jemand genauso wie ich gerade am Knobeln ist, welche Akkus passen und welche nicht. Als besonderes Goodie: 10 Pixel in der Originalgröße (hier herunterladen; 2,1 MB) entsprechen ca. 1 mm. Bisher einzige Modifikation: Der Halte-Bolzen für die Haube ist nach unten montiert, und auf einer kleinen Platik-Platte ca. 2,5 cm nach vorne verlegt – evtl. muss der aber weichen – wenn der Akku groß genug ist, kann die Haube eh nirgendwo hin…

Aperture Places

Nachdem mich das hier einen halben Tag (doch etwas untypisch für Apple-Produkte) gekostet hat, poste ich es hier. Das Frustrierende daran ist, dass man sofort Lösungen findet, wenn man weiß, woran es liegt… Grml.

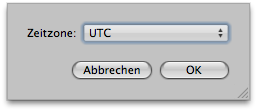
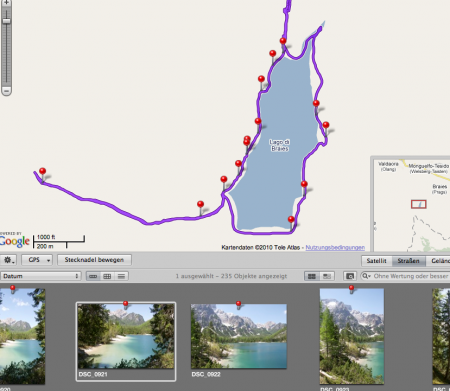
Ich habe heute meine GPS-Tracks vom Columbus V900 heruntergeladen, durch GPS Babel gejagt, in Aperture importiert, ein Foto auf den Track gezogen – und war geschockt. Die Bilder lagen komplett falsch, Teile der Bilder wurden gar nicht auf dem Track platziert – alles sehr merkwürdig. Nach einer wahren Odysee durchs Netz (wobei ich über BT747 gestolpert bin, ein sehr nettes Programm zum Konvertieren von Tracks), unzähligen Konvertierungen in Formate über andere Formate – alle mit dem selben krampfigen Ergebnis – habe ich herausgefunden, woran es liegt: an der Zeitzone, die Aperture den Track-Dateien unterstellt. Ein Klick hier:

…und (fast) alles war ok – wenn man vorher den Cursor kurz über eine andere Zeitzone fährt, kapiert Aperture auch, dass sich etwas geändert hat. Apple, es wäre super, wenn Ihr diesen Bug im nächsten Aperture-Update schleunigst ausbügeln könntet… :D Folgender Workflow ist nötig:

  1. Columbus-CSV-Dateien nach GPX konvertieren (wurst, ob mit BT747, GPS Babel oder anderem Programm)
  2. Track in Aperture laden
  3. Track auf UTC einstellen
  4. Erstes Foto platzieren (Vorsicht: mit dem korrekten Offset zur UTC – in meinem Fall waren das MESZ-UTC= -60 min.)
  5. Restliche Fotos von Aperture zuordnen lassen.

Preseeding Ubuntu Karmic

(English article below) Dieser Artikel ist eine Dokumentation von vielen schweißtreibenden Besuchen im Netz. Leider gibt es für Ubuntu keine so schön zusammenhängende Doku wie für Debian – liegt aber auch daran, dass man mit Ubiquity noch viel mehr schönes Zeug anstellen kann wie mit dem Debian-Installer. Um es einem noch breiteren Publikum zugänglich zu machen, ist dieses Posting ausnahmsweise auf Englisch.

So you want to preseed Ubuntu? Fine. You’ve probably read this article. Maybe you’ve seen the scripts, too. However, there are still some gaps wide enough to stumble into. Here’s a quick overview over how to create an unattended install CD. If you want to add customized packages, you’re a bit more adventurous than I was – but this might give you a head start, anyway.

Getting the files out of the ISO

Here’s your first stop. Go grab everything that’s on the original CD image (no need to burn it, the file itself is just fine if you do this):

mkdir loopdir
mount -o loop ubuntu_whatever.iso loopdir
# you might need a "modprobe loop" first

Now, grab everything inside and copy it to a place where you can modify it:

mkdir cd
cp -a loopdir/{.disk,*} cd/

(Others might find a…

rsync -a -H loopdir/ cd

…more elegant. Whatever you do, don’t miss the “.disk” directory – otherwise, you’ll end up with annoying errors when booting from the final CD – which say that it cannot find a live file system).

The preseed configuration file

Now, you’re here. That’s a lot of nice things you can configure there – but the main thing missing in the 8.xx docs is the part about Ubiquity. Here’s an excerpt from my preseed.cfg (you might use that as a quick start – but note that I’ve preseeded a German installation):

# make sure we get over page 6 of the installation questions:
ubiquity        ubiquity/summary        note
# disable this for one single click before reboot:
ubiquity        ubiquity/reboot boolean true
# the rest should be quite self-explanatory:
ubiquity        languagechooser/language-name   select  German
ubiquity        countrychooser/shortlist        select  DE
ubiquity        countrychooser/countryname      select  Germany
ubiquity        countrychooser/country-name      string Germany
debconf         debconf/language        string  de
ubiquity        console-keymaps-at/keymap       select  de
ubiquity        tzconfig/gmt    boolean false
ubiquity        time/zone       select  Europe/Berlin
ubiquity        debian-installer/country        string DE
ubiquity        debian-installer/language       string de
ubiquity        debian-installer/locale select  de_DE.UTF-8
console-setup   console-setup/layoutcode        select  de
console-setup   console-setup/modelcode select  pc105
console-setup   console-setup/layout    select  Germany
console-setup   console-setup/variant   select  Germany

ubyquity        localechooser/supported-locales multiselect\
de_DE.UTF-8 en_US.UTF-8
# this is what the "late_command" in d-i does. I prefer a trick like
# this to do some setup work on the freshly installed machine -
# this script gets pulled from 192.168.1.1 via http and should
# disable itself after execution. Comment this away if you don't
# want it!
ubiquity        ubiquity/success_command        string  wget \ http://192.168.1.1/ubuntu_deploy -O /target/etc/init.d/S99deploy; ln -s\ /etc/init.d/S99deploy /target/etc/rc2.d/S99deploy; chmod ugo+x /target/etc/init.d/S99deploy

Modify boot command line

I prefer the elegant way: I modify menu.cfg in the isolinux dir. Add these lines to the position you like (add it to text.cfg if you want to have it in between the rest of the options):

label unattended
        menu label Unattended auto install
        kernel /casper/vmlinuz
        append file=/cdrom/preseed/my.seed boot=casper initrd=/casper/initrd.lz debian-installer/locale=de_DE \
automatic-ubiquity noprompt quiet splash --

Modify the locale and name of the preseeding file. Make sure you boot into “automatic-ubiquity”. Use noprompt if you want to use ubiquity’s reboot-option in the preseed file.

Create the ISO

At this point, I don’t go any further. If you want to add packages, do so. But be warned that all the gpg stuff mentioned in the docs apply in that case.

mkisofs -o my_iso_file.iso -r -J -no-emul-boot -boot-load-size 4 -boot-info-table -b isolinux/isolinux.bin -c isolinux/boot.cat ./cd

Use Virtualbox for extensive testing. Burn at will. And: have fun!So you want to preseed Ubuntu? Fine. You’ve probably read this article. Maybe you’ve seen the scripts, too. However, there are still some gaps wide enough to stumble into. Here’s a quick overview over how to create an unattended install CD. If you want to add customized packages, you’re a bit more adventurous than I was – but this might give you a head start, anyway.

Getting the files out of the ISO

Here’s your first stop. Go grab everything that’s on the original CD image (no need to burn it, the is is just fine if you do this):

mkdir loopdir
mount -o ubuntu_whatever.iso loopdir
# you might need a "modprobe loop" first

Now, grab everything inside and copy it to a place where you can modify it:

mkdir cd
cp -a loopdir/* cd/
cp -a loopdir/.d* cd/

(Others might find a…

rsync -a -H loopdir/ cd

…more elegant. Whatever you do, don’t miss the “.disk” directory – otherwise, you’ll end up with annoying errors when booting from the final CD – which say that it cannot find a live file system).

The preseed configuration file

Now, you’re here. That’s a lot of nice things you can configure there – but the main thing missing in the 8.xx docs is the part about Ubiquity. Here’s an excerpt from my preseed.cfg (you might use that as a quick start – but note that I’ve preseeded a German installation):

# make sure we get over page 6 of the installation questions:
ubiquity        ubiquity/summary        note
# disable this for one single click before reboot:
ubiquity        ubiquity/reboot boolean true
# the rest should be quite self-explanatory:
ubiquity        languagechooser/language-name   select  German
ubiquity        countrychooser/shortlist        select  DE
ubiquity        countrychooser/countryname      select  Germany
ubiquity        countrychooser/country-name      string Germany
debconf         debconf/language        string  de
ubiquity        console-keymaps-at/keymap       select  de
ubiquity        tzconfig/gmt    boolean false
ubiquity        time/zone       select  Europe/Berlin
ubiquity        debian-installer/country        string DE
ubiquity        debian-installer/language       string de
ubiquity        debian-installer/locale select  de_DE.UTF-8
console-setup   console-setup/layoutcode        select  de
console-setup   console-setup/modelcode select  pc105
console-setup   console-setup/layout    select  Germany
console-setup   console-setup/variant   select  Germany

ubyquity        localechooser/supported-locales multiselect\
de_DE.UTF-8 en_US.UTF-8
# this is what the "late_command" in d-i does. I prefer a trick like
# this to do some setup work on the freshly installed machine -
# this script gets pulled from 192.168.1.1 via http and should
# disable itself after execution. Comment this away if you don't
# want it!
ubiquity        ubiquity/success_command        string  wget \ http://192.168.1.1/ubuntu_deploy -O /target/etc/init.d/S99deploy; ln -s\ /etc/init.d/S99deploy /target/etc/rc2.d/S99deploy; chmod ugo+x /target/etc/init.d/S99deploy

Modify boot command line

I prefer the elegant way: I modify menu.cfg in the isolinux dir. Add these lines to the position you like (add it to text.cfg if you want to have it in between the rest of the options):

label unattended
        menu label Unattended auto install
        kernel /casper/vmlinuz
        append file=/cdrom/preseed/my.seed boot=casper initrd=/casper/initrd.lz debian-installer/locale=de_DE \
automatic-ubiquity noprompt quiet splash --

Modify the locale and name of the preseeding file. Make sure you boot into “automatic-ubiquity”. Use noprompt if you want to use ubiquity’s reboot-option in the preseed file.

Create the ISO

At this point, I don’t go any further. If you want to add packages, do so. But be warned that all the gpg stuff mentioned in the docs apply in that case.

mkisofs -o my_iso_file.iso -r -J -no-emul-boot -boot-load-size 4 -boot-info-table -b isolinux/isolinux.bin -c isolinux/boot.cat ./cd

Use Virtualbox for extensive testing. Burn at will. And: have fun!
Twitter-Clients für den Mac II

Eigentlich ist das nur ein Verweis auf den Ursprungs-Artikel – da habe ich noch das eine oder andere angefügt – Tweetie ist der letzte Client, den ich in die Finger bekommen habe, und der mir (fast ganz) super gefällt. Also: Klick mich.

(Das finale) Update: auf Freewareosx gibt es jetzt einen Vergleich von 12 Twitter-Clients. Inklusive Feature-Vergleichstabelle. Damit stelle ich das Posten zu dem Thema ein. ;-)

Mini Titan Bauvideo

Oh. Das habe ich ja noch gar nicht gepostet. Sogar Minititan.de hat das verlinkt – und ich noch nicht, obwohl das Video von mir ist? Also: Hier ist mein Minititan-Bauvideo. Alles drauf, natürlich „etwas“ Zeitraffer. ;-)

RCMovie-Link.

Bei Gelegenheit muss ich mal das Original-Video hier hochladen – nachdem Anfang und Ende von der RCMovie-Software etwas verstümmelt worden sind.